 |
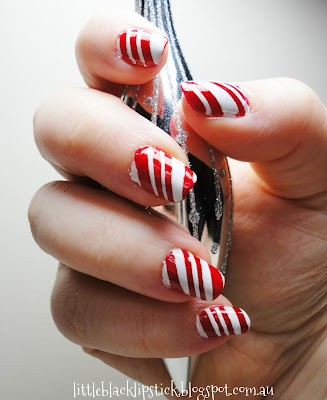
| The finished Candy Cane Nails |
As it's early December I thought I'd get right into the holiday spirit and pimp out my nails, candy cane style. It is pretty simple to achieve, although it's a little fiddly and takes time.
To achieve this look you will need:
TBase Coat - Sally Hansen Miracle Cure
TRed Nail Polish - OPI The Spy Who Loved Me (Skyfall collection)
TWhite Nail Polish - L.A. Colors Art Deco White
TTop Coat - Seche Vite
TSticky Tape
You don't have to used any of these base coats, top coats or colours, you can use whatever you like or have.
 |
| Base coat and colour |
TStep 1: Apply base coat and allow to dry. Apply a red nail polish of your choice, I applied two coats. I chose this colour because it's a bright red with golden micro shimmer. You may not be able to see in the photos but I chose a red glitter polish as it adds another dimension rather than a flat red.
I cleaned up around my nails after the two coats with a cotton tip soaked in nail polish remover.
 |
| Taped edges |
TStep 2: Apply top coat and allow to completely dry. I tried using the tape over the red without a top coat and noticed some of the glitter was coming off on the tape. I then taped around my nail so there wasn't so much cleaning up around the edges.
 |
| Taping the candy cane stripes |
TStep 3: Cut thin strips of tape and place them on the nail. This is probably the most time consuming part. I would recommend cutting out all the pieces of tape before painting any of the white polish. I used three pieces of tape around the nail. Then three thicker (about 3mm I did this by eye) and two thinner (1mm) strips. I think to make it look most like a candy cane there needs to be different widths in the stripes.
As per the image above, I applied the thicker stripe at the base of the nails, then the two thinner strips and followed by the two thicker strips. I made sure each nail had thicker white part and thinner white stripes either side.
When placing the tape, make sure that the ends hang over so that it's easier to remove. I also pressed down the tape firmly at the sides of the nail so that there were no gaps.
 |
| Apply the white and removing tape |
TStep 4: Paint over with white and remove the tape. Apply the white polish and while it's still wet remove the tape. I found I had the best results removing one piece of tape at a time instead of the whole thing. They are perfect and sometimes the white strayed away from the line. It's pretty easy to clean it up with either the red or white depending.
 |
| Clean up around edges |
TStep 5: Once all of your nails are painted and dry. Remove the excess and tidy up the nail. I applied the top coat on the same angle as the stripes just in case the white ran into the red. I was planning on applying either a glitter top coat or glitter just over the white, but I like just the crisp white.
I hope you enjoyed this tutorial. If you try this out or want to share your Christmas nail art designs with me, send me a pic on Facebook here or Instagram here.
Hope you are well and getting into the festive spirit, if that's your thing :)
No comments:
Post a Comment